
Middlewares
Vulcand allows you to compile in middlewares that can change, intercept or reject the request or even alter the response,
and provides vulcanbundle command line tool to make it easy.
Middlewares
Middlewares are allowed to observe, modify and intercept http requests and responses. Each middleware is fully compatible with Go standard library http.Handler interface:
type Handler interface {
      ServeHTTP(ResponseWriter, *Request)
}
ServeHTTPis called before the request is going to be forwarded to the server selected by the load balancer. This function can modify or intercept request before it gets to a final destination and change the response.
Middleware Chains
Middleware chains define an order in which middlewares will be executed. Each Middleware handler will explicitly call next handler:
func (h *MyHandler) ServeHTTP(w http.ResponseWriter, r *Request) {
     // do something with the request and pass to the next handler
     h.next.ServeHTTP(w, r)
}
In case if middleware decides to reject the request, it should not call next, and instead write it’s own response:
func (h *MyHandler) ServeHTTP(w http.ResponseWriter, r *Request) {
    io.WriteString(w, "access denied")
    io.WriteHeader(403)
    return
}
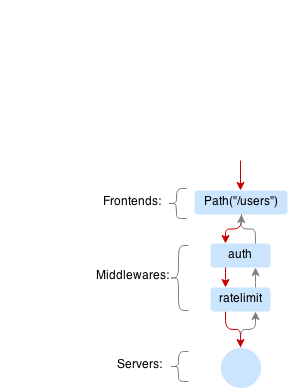
Example of a request that passes auth and limiting middlewares and hits the server:
Example of a request that is rejected by limiting middleware:
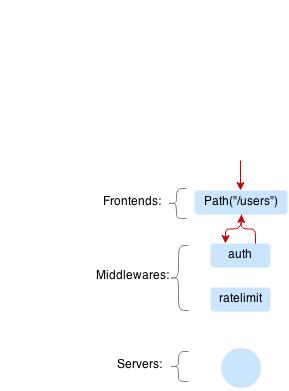
In this case server won’t process the request.
Vbundle
Vbundle is a very simple command line tool that creates a new version of vulcand daemon by writing a new main.go that imports the vulcand packages and your plugins:
import (
   "github.com/mailgun/vulcand"
   "github.com/example/extension"
)

func main() {
    vulcand.RegisterPlugin(extension.Spec())
    vulcand.Run()
}
Vbundle does not download anything from the internet, it just generates the program for you. To compile, the packages and dependencies should be in your working environment.
Example - Auth middleware
In this example, we will write a new fully functional (but insecure) middleware that will require all requests to be authorized with HTTP basic auth.
For this demo, we’ve created auth package in our environment. Full source code is available at: http://github.com/mailgun/vulcand-auth
Describing your middleware
Vulcand looks for a special function GetSpec that returns all that it needs to know about this middleware.
import (
    "github.com/mailgun/vulcand/plugin"
)

const Type = "auth"

func GetSpec() *plugin.MiddlewareSpec {
       return &plugin.MiddlewareSpec{
               Type:      Type,       // A short name for the middleware
               FromOther: FromOther,  // Tells vulcand how to create middleware from another one
               FromCli:   FromCli,    // Tells vulcand how to create middleware from CLI
               CliFlags:  CliFlags(), // Vulcand will add this flags CLI command
       }
}
We will get back to each one of this functions later, for now let’s create a middleware struct itself. Our Auth plugin is a struct that stores username and password.
Note
Your struct should contain only values expected in: http://golang.org/pkg/encoding/json/#Marshal
// AuthMiddleware struct holds configuration parameters and is used to
// serialize/deserialize the configuration from storage engines.
type AuthMiddleware struct {
       Password string
       Username string
}
Handler
Let’s define ServeHTTP handler that will be called on each request and response.
 // Auth middleware handler
 type AuthHandler struct {
       cfg  AuthMiddleware
       next http.Handler
}

// This function will be called each time the request hits the location with this middleware activated
func (a *AuthHandler) ServeHTTP(w http.ResponseWriter, r *http.Request) {
       auth, err := utils.ParseAuthHeader(r.Header.Get("Authorization"))
       // Reject the request by writing forbidden response
       if err != nil || a.cfg.Username != auth.Username || a.cfg.Password != auth.Password {
               w.WriteHeader(http.StatusForbidden)
               io.WriteString(w, "Forbidden")
               return
       }
       // Pass the request to the next middleware in chain
       a.next.ServeHTTP(w, r)
}
Note
it is important to call next handler if you want to pass the request to the server
As you may noticed, AuthHandler is fully compatible with http.Handler. This is very handy as you may now re-use all these middlewares available in the internet, like this one:
Utility functions
Let’s define some other important functions as the next step.
// This function is optional but handy, used to check input parameters when creating new middlewares
func New(user, pass string) (*AuthMiddleware, error) {
       if user == "" || pass == "" {
               return nil, fmt.Errorf("Username and password can not be empty")
       }
       return &AuthMiddleware{Username: user, Password: pass}, nil
}

// This function is important, it's called by vulcand to create a new handler from the middleware config and put it into the
// middleware chain. Note that we need to remember 'next' handler to call
func (c *AuthMiddleware) NewHandler(next http.Handler) (http.Handler, error) {
       return &AuthHandler{next: next, cfg: *c}, nil
}

// String() will be called by loggers inside Vulcand and command line tool.
func (c *AuthMiddleware) String() string {
       return fmt.Sprintf("username=%v, pass=%v", c.Username, "********")
}
Constructors
As the final step, lets define the functions required by GetSpec, these ones will be called by Vulcand when it will need to
create new auth middlewares:
// FromOther Will be called by Vulcand when engine or API will read the middleware from the serialized format.
// It's important that the signature of the function will be exactly the same, otherwise Vulcand will
// fail to register this middleware.
// The first and the only parameter should be the struct itself, no pointers and other variables.
// Function should return middleware interface and error in case if the parameters are wrong.
func FromOther(c AuthMiddleware) (plugin.Middleware, error) {
       return New(c.Username, c.Password)
}

// FromCli constructs the middleware from the command line
func FromCli(c *cli.Context) (plugin.Middleware, error) {
       return New(c.String("user"), c.String("pass"))
}

// CliFlags will be used by Vulcand construct help and CLI command for the vctl command
func CliFlags() []cli.Flag {
       return []cli.Flag{
               cli.StringFlag{"user, u", "", "Basic auth username", ""},
               cli.StringFlag{"pass, p", "", "Basic auth pass", ""},
       }
}
Imports
Let’s take a look at all imports used in the http://github.com/mailgun/vulcand-auth
// Note that I import the versions bundled with vulcand. That will make our lives easier, as we'll use exactly the same versions used
// by vulcand. We are escaping dependency management troubles thanks to Godep.
import (
       "fmt"
       "io"
       "net/http"

       "github.com/mailgun/vulcand/Godeps/_workspace/src/github.com/codegangsta/cli"
       "github.com/mailgun/vulcand/Godeps/_workspace/src/github.com/mailgun/oxy/utils"
       "github.com/mailgun/vulcand/plugin"
)
Vulcand uses Godep to manage it dependencies, we encourage you to read it’s docs. That’s why all imports to shared libraries are pointing to versions vendored with the version of vulcand you are using.
Getting it together
Let’s create a folder in GOPATH environment that will be used for your version of Vulcand compiled with the new middleware.
In our case it looks like this:
/home/alex/goworld/src/github.com/mailgun/vulcand-bundle
In your case it would be something different. Now execute the vbundle command, you should see something like this:
$ vbundle init --middleware=github.com/mailgun/vulcand-auth/auth
Dec 26 01:02:57.180: INFO PID:16442 [main.go:51] SUCCESS: bundle vulcand and vctl completed
Note
--middleware=github.com/mailgun/vulcand-auth/auth flag tells the tool to include our auth middleware into bundle.
Let us check that it actually did something:
$ ls
main.go  registry  vctl
What just happened? Vbundle wrote a new version of main.go and vctl that have our auth middleware plugged in.
The final step would be to install the bundle. Let’s cd to the vulcand-bundle dir and execute the build commands
$ go build -o vulcand
$ pushd vctl/ && go build -o vctl && popd
Congrats! Now you have your version of vulcand and vctl Let’s use it and try a couple of tricks with the new middleware
to ensure it actually works.
We need to start the new binary and configure the server first. (If you have it configured, just skip configuration steps below)
# start the daemon
$ ./vulcand -etcd http://localhost:4001

# add host, location and upstream with endpoints via newly compiled command line tool
$ ./vctl/vctl backend upsert -id b1
$ ./vctl/vctl server upsert -id srv1 -b b1 -url http://localhost:5000
$ ./vctl/vctl frontend upsert -id f1 -b b1 -route 'Path("/")'
Using Auth middleware
Now to the fun part, you can configure the new authorization. Make sure that auth command is now available:
$ ./vctl/vctl auth --help
$ ./vctl/vctl auth upsert --help
Let’s play with the new feature!
# add the auth
$ ./vctl/vctl auth upsert -f f1 -user=hello -pass=world
OK: auth upserted

# try it out
$ curl http://localhost:8181/
Forbidden

# ok, here you go:
$ curl -u hello:world http://localhost:8181/
ok
Etcd
Note that you can use Etcd to configure the new middleware, vulcand will load it from json representation:
$ etcdctl set /vulcand/frontends/f1/middlewares/auth1 '{"Type": "auth", "Middleware":{"Username": "user", "Password": "secret1"}}'
Testing
We were in a hurry trying to get it all working, didn’t we? Now we can step back and cover it all by tests:
https://github.com/mailgun/vulcand-auth/blob/master/auth/auth_test.go
Maintenance
Note that vbundle simply writes the new vulcanbundle for you, and does not try to get in your way of managing your environment.
However, here are a couple of tips if you feel like you need ones:
- Your new bundle is just a go program like any other one out there.
- This means that you can add it to your repo, and update periodically by calling
vbundle initwith new parameters. - You can use
godep save -r ./...with new bundle as well to make sure your bundle’s deps are always there.